
Real Estate Price Prediction Engine using Dash
- Tanya Sharma
- Jun 27, 2024
- 7 min read

An End-to-End Machine Learning Model encompasses the entire lifecycle of a machine learning project, spanning data collection, preprocessing, model development, deployment, and ongoing maintenance. This article provides a practical guide on constructing such a model using Python and Dash, a user interface framework.
Constructing an End-to-End Machine Learning Model:
Step-by-Step Process
To create an end-to-end Machine Learning model, initially, you must train a machine learning model, as is typical in any machine learning endeavour. Once the model is trained, follow these steps to transform it into an end-to-end solution using the Dash framework:
1. Establish a new Dash application.
2. Design the application layout using Dash's HTML and Core Components, incorporating input fields, buttons, and areas to display outputs.
3. Implement callback functions to define the application's interactivity, handle user inputs, execute model predictions, and present results.
4. Integrate the pre-trained model into the application for making predictions.
Let's Proceed with Building the End-to-End Machine Learning Model
The initial steps involve reading the dataset and training the machine learning model.
let's go through the code line by line:
Code 1:
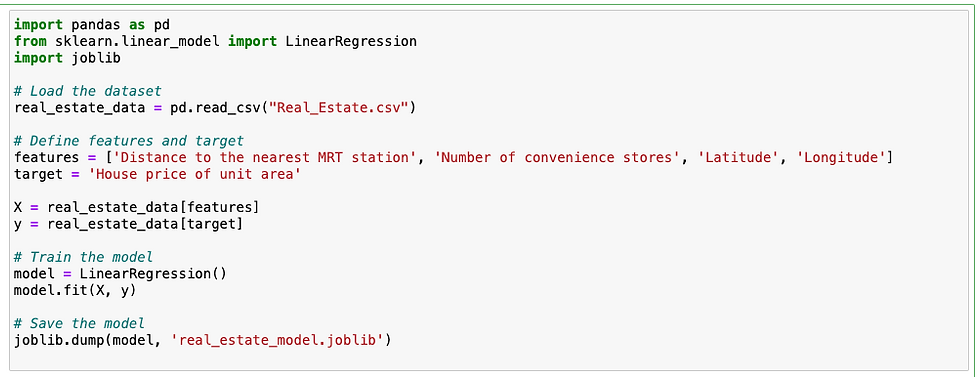
Explanation:
import pandas as pd
This line imports the `pandas` library, which is a powerful data manipulation and analysis tool in Python. It is often used for handling structured data.
# Load the dataset
real_estate_data = pd.read_csv("Real_Estate.csv")
#replace the path with your path
This line reads a CSV file located at the specified path into a `pandas` DataFrame. The `pd.read_csv()` function is used to load the dataset, which is stored in the variable `real_estate_data`. Replace the path with the actual path to your CSV file.
from sklearn.linear_model import LinearRegression
import joblib
These lines import functions and classes from the `scikit-learn` library:
`LinearRegression` is a class for creating a linear regression model.
# Selecting features and target variable
features = ['Distance to the nearest MRT station', 'Number of convenience stores', 'Latitude', 'Longitude']
target = 'House price of unit area'
These lines define the feature columns and the target column:
`features` is a list of column names in the dataset that will be used as input variables (independent variables).
`target` is the name of the column that will be predicted by the model (dependent variable).
X = real_estate_data[features]
y = real_estate_data[target]
These lines create the feature matrix `X` and the target vector `y`:
`X` is a DataFrame containing the columns specified in the `features` list.
`y` is a Series containing the values of the target column.
# Train the model
model = LinearRegression()
model.fit(X, y)
# Save the model
joblib.dump(model, 'real_estate_model.joblib')
Code 2:

Install the dash library.
Code 3:
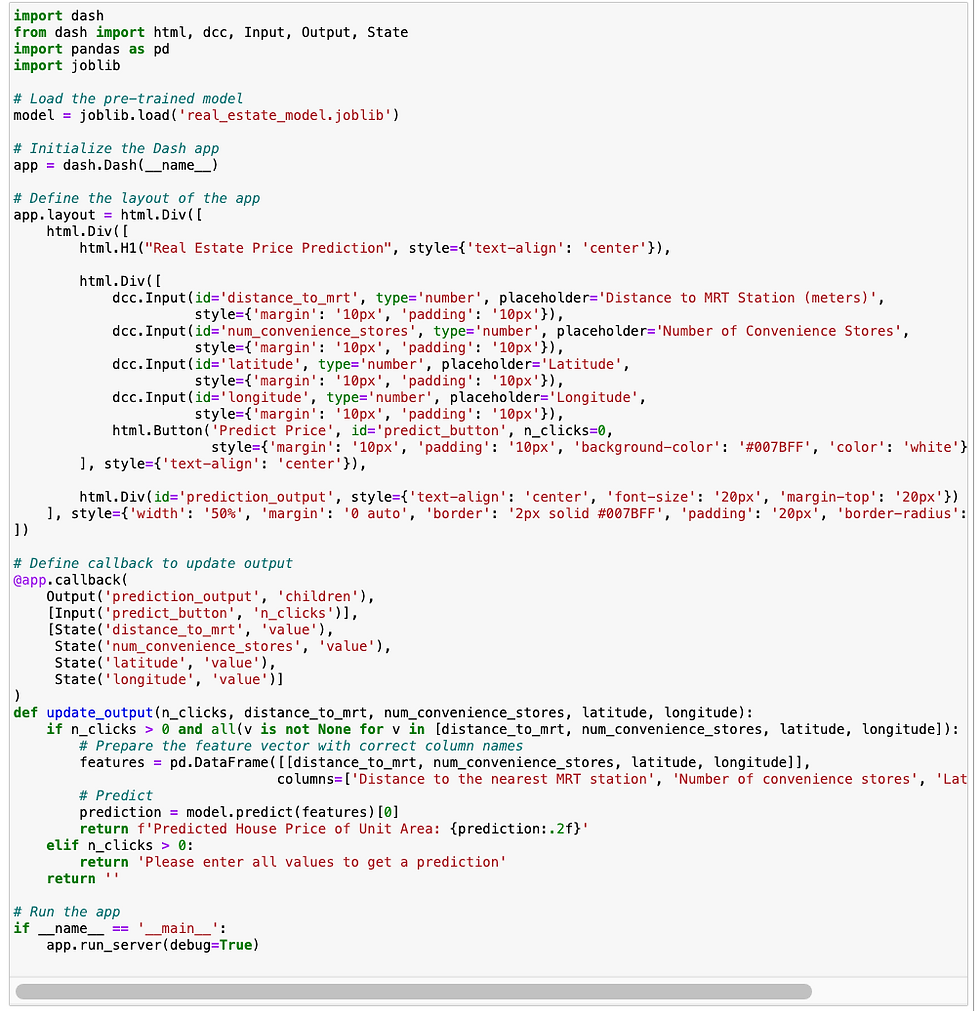
Let us explain the code in different parts so that you can understand it in a better way.
Let's go through the code line by line:
1. import dash
Imports the `dash` library, which is used for building web applications with Python.
2. from dash import html, dcc, Input, Output, State
Imports specific components from the `dash` library:
- `html`: Allows creating HTML elements.
- `dcc`: Provides a set of higher-level components like dropdowns, graphs, and sliders.
- `Input`, `Output`, `State`: Used for creating interactivity in the app, managing inputs, outputs, and states for callbacks.
3. import pandas as pd
Imports the `pandas` library for data manipulation and analysis.
4. import joblib
Imports the `joblib` library for saving and loading Python objects, particularly useful for machine learning models.
# Load the pre-trained model
model = joblib.load('real_estate_model.joblib')
5. model = joblib.load('real_estate_model.joblib')
Loads the pre-trained model saved in the file `real_estate_model.joblib` into the variable `model`.
# Initialize the Dash app
app = dash.Dash(__name__)
6. app = dash.Dash(__name__)
Initializes a new Dash web application. The `__name__` argument ensures that the app knows its own name, which is used in various contexts within Dash.
# Define the layout of the app
app.layout = html.Div([
html.Div([
html.H1("Real Estate Price Prediction", style={'text-align': 'center'}),
html.Div([
dcc.Input(id='distance_to_mrt', type='number', placeholder='Distance to MRT Station (meters)',
style={'margin': '10px', 'padding': '10px'}),
dcc.Input(id='num_convenience_stores', type='number', placeholder='Number of Convenience Stores',
style={'margin': '10px', 'padding': '10px'}),
dcc.Input(id='latitude', type='number', placeholder='Latitude',
style={'margin': '10px', 'padding': '10px'}),
dcc.Input(id='longitude', type='number', placeholder='Longitude',
style={'margin': '10px', 'padding': '10px'}),
html.Button('Predict Price', id='predict_button', n_clicks=0,
style={'margin': '10px', 'padding': '10px', 'background-color': '#007BFF', 'color': 'white'}),
], style={'text-align': 'center'}),
html.Div(id='prediction_output', style={'text-align': 'center', 'font-size': '20px', 'margin-top': '20px'})
], style={'width': '50%', 'margin': '0 auto', 'border': '2px solid #007BFF', 'padding': '20px', 'border-radius': '10px'})
])
7. app.layout = html.Div([...])
Defines the layout of the Dash app using HTML components provided by the `dash_html_components` library (`html`).
8. html.Div([ ... ])
Creates a `div` element that contains other HTML elements. It's the outer container for the application.
9. html.H1("Real Estate Price Prediction", style={'text-align': 'center'})
Creates an `h1` header with the text "Real Estate Price Prediction" and centers it using CSS styling.
Component Breakdown:
dcc.Input: This is a component from Dash Core Components (dcc), which is part of the Dash library. It creates an input box that allows users to enter data.
id='distance_to_mrt':
This assigns a unique identifier to the input component. The id is crucial because it allows other parts of the Dash app (such as callbacks) to reference this specific input element.
Here, the id is set to 'distance_to_mrt', indicating that this input will be used to capture the distance to the nearest MRT station.
type='number':
This specifies the type of data that the input will accept.
type='number' means that the input box will only accept numerical values. This is useful for ensuring data integrity, as it restricts users from entering text or other non-numeric characters.
placeholder='Distance to MRT Station (meters)':
This sets a placeholder text for the input box.
The placeholder text, 'Distance to MRT Station (meters)', is displayed inside the input box when it is empty. This text serves as a prompt to the user, indicating what kind of information should be entered into the input box.
style={'margin': '10px', 'padding': '10px'}:
This applies custom CSS styling to the input box.
style is a dictionary where each key is a CSS property and the corresponding value is the desired value for that property.
margin: Adds space around the input box. margin: '10px' means there will be a 10-pixel space around the input box on all sides.
padding: Adds space inside the input box, between the content (the text) and the border of the input box. padding: '10px' means there will be a 10-pixel space inside the input box on all sides.
10. dcc.Input(id='distance_to_mrt', type='number', placeholder='Distance to MRT Station (meters)', style={'margin': '10px', 'padding': '10px'})
Creates an input field for the user to enter the distance to the nearest MRT station in meters.
11. dcc.Input(id='num_convenience_stores', type='number', placeholder='Number of Convenience Stores', style={'margin': '10px', 'padding': '10px'})
Creates an input field for the user to enter the number of convenience stores.
12. dcc.Input(id='latitude', type='number', placeholder='Latitude', style={'margin': '10px', 'padding': '10px'})
Creates an input field for the user to enter the latitude.
13.dcc.Input(id='longitude', type='number', placeholder='Longitude', style={'margin': '10px', 'padding': '10px'})
Creates an input field for the user to enter the longitude.
14. html.Button('Predict Price', id='predict_button', n_clicks=0, style={'margin': '10px', 'padding': '10px', 'background-color': '#007BFF', 'color': 'white'})
Creates a button labeled "Predict Price". The `id` is `predict_button` and `n_clicks=0` initializes the number of clicks to zero. It also applies some CSS styling to the button.
15. html.Div(id='prediction_output', style={'text-align': 'center', 'font-size': '20px', 'margin-top': '20px'})
Creates a `div` element to display the prediction output. It is initially empty and will be updated by the callback function.
16. style={'width': '50%', 'margin': '0 auto', 'border': '2px solid #007BFF', 'padding': '20px', 'border-radius': '10px'}
Applies CSS styling to the outer container to center it, add padding, a border, and rounded corners.
# Define callback to update output
@app.callback(
Output('prediction_output', 'children'),
[Input('predict_button', 'n_clicks')],
[State('distance_to_mrt', 'value'),
State('num_convenience_stores', 'value'),
State('latitude', 'value'),
State('longitude', 'value')]
)
17. @app.callback(...)
Defines a callback function to update the output of the app when certain inputs change. This decorator links the inputs and outputs of the function to the app's components.
18. Output('prediction_output', 'children')
Specifies that the callback will update the `children` property of the component with `id='prediction_output'`.
19. [Input('predict_button', 'n_clicks')]
Specifies that the callback function should be triggered whenever the `n_clicks` property of the `predict_button` changes (i.e., whenever the button is clicked).
20. [State('distance_to_mrt', 'value'), State('num_convenience_stores', 'value'), State('latitude', 'value'), State('longitude', 'value')]
Specifies that the callback function will use the current values of these input fields as its state.
def update_output(n_clicks, distance_to_mrt, num_convenience_stores, latitude, longitude):
if n_clicks > 0 and all(v is not None for v in [distance_to_mrt, num_convenience_stores, latitude, longitude]):
# Prepare the feature vector with correct column names
features = pd.DataFrame([[distance_to_mrt, num_convenience_stores, latitude, longitude]],
columns=['Distance to the nearest MRT station', 'Number of convenience stores', 'Latitude', 'Longitude'])
# Predict
prediction = model.predict(features)[0]
return f'Predicted House Price of Unit Area: {prediction:.2f}'
elif n_clicks > 0:
return 'Please enter all values to get a prediction'
return ''
21. def update_output(n_clicks, distance_to_mrt, num_convenience_stores, latitude, longitude)
Defines the callback function `update_output` which takes in the number of clicks and the values from the input fields as parameters.
22. if n_clicks > 0 and all(v is not None for v in [distance_to_mrt, num_convenience_stores, latitude, longitude])
Checks if the button has been clicked at least once and all input values are provided (not `None`).
23. features = pd.DataFrame([[distance_to_mrt, num_convenience_stores, latitude, longitude]], columns=['Distance to the nearest MRT station', 'Number of convenience stores', 'Latitude', 'Longitude'])
Creates a DataFrame with a single row containing the input values. The column names match those used during model training.
24.prediction = model.predict(features)[0]
- Uses the pre-trained model to predict the house price based on the input features. `model.predict(features)` returns an array, and `[0]` extracts the first element (the prediction).
25. return f'Predicted House Price of Unit Area: {prediction:.2f}'
Returns a formatted string displaying the predicted house price with two decimal places. This string is displayed in the `prediction_output` div.
26. elif n_clicks > 0
- Checks if the button has been clicked but not all input values are provided.
27. return 'Please enter all values to get a prediction'
- Returns a message prompting the user to enter all input values.
28. return ''
Returns an empty string if the button has not been clicked.
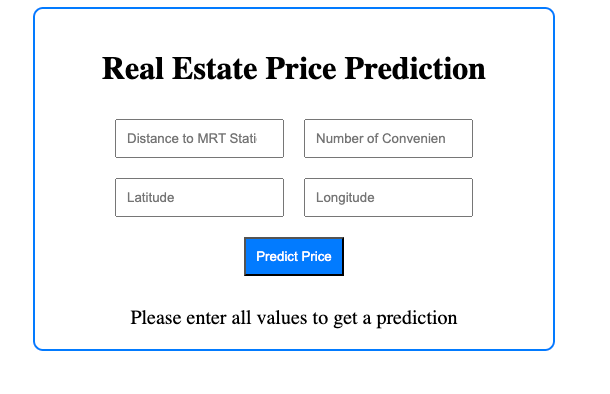
This is how your app will look like:
# Run the app
if __name__ == '__main__':
app.run_server(debug=True)
29.`if __name__ == '__main__'
Ensures that the following block of code is executed only if the script is run directly (not imported as a module).
30. app.run_server(debug=True)
Runs the Dash app with debugging enabled. The app will be hosted on a local server, and any changes to the code will automatically reload the app in the browser.
After running the app.

So, this is how you can build an End-to-End Machine Learning model using Python.
Link of Github - https://github.com/Tanya2204/MY-Projects/blob/adbcee8c44fdc00ff63e9dea2d96a26fdb1d2bc4/ml%20end%20to%20end%20-%20real%20estate.ipynb


Comments